Share
Share

11.04.2023
The Personal Data Protection Authority (the Authority) recently prepared and shared with the public a draft guide containing recommendations for the protection of personal data under Law No. 6698 on the Protection of Personal Data (the Law) for website operators processing personal data through cookies. The guide was open for feedback from relevant parties for 30 days, until February 10, 2022. The guide focuses on the use of cookies that concern everyone with a website, including cookie declarations, cookie banners, and the use of these cookies.
In this blog post, we covered how to set up Consent Mode for websites using Google Tag Manager in accordance with the directions in the guide.
Note: The items mentioned in this article do not constitute legal advice.
Google provides integration with 9 CMPs (Consent Management Platforms) for Consent Mode setup. Some tools also have templates that can be used on Google Tag Manager. In this guide, we will be using Cookiebot and Google Tag Manager for our setup. During this process, a cookie consent banner in your chosen format will be added to your website, along with a dynamically updated informative text about the cookies used on the site. The cookie consent banner should be active on all pages, while the aforementioned text should only be added to the page with your KVKK Information Text.

After signing up for the site, you can start by adding your site’s domain to the screen you are redirected to. By default, Cookiebot scans the cookies your site uses monthly and sends you a report. You can change this frequency. The scanning process takes approximately 24 hours. You can click here for more detailed information about the scanning process.

In the “Dialog” tab, you can customize the appearance and functions of your banner. There are 3 different design options in this section. We currently use the “Swift” design on perfist.com. You can choose between two ready-made designs or add your custom-designed banner.

For KVKK compliance, you need to present the permission types on the banner as opt-in, meaning that the cookie options on the banner should be displayed unselected as shown below.

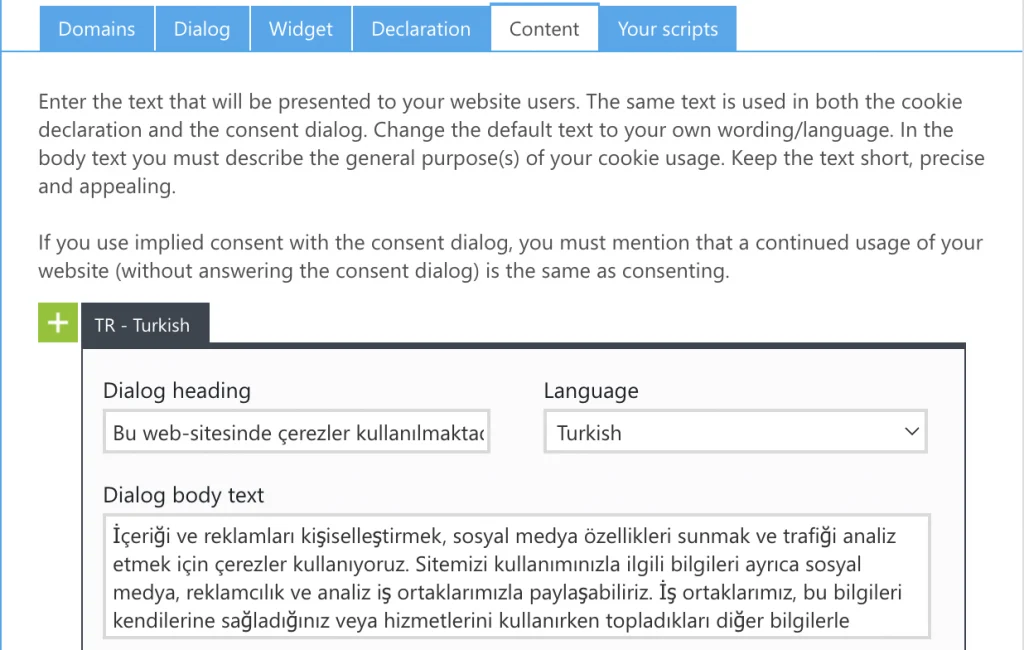
From the “Content” tab, you can edit your cookie information text and add different languages. In addition, there is an option to display the information text in the language used by the user. The page where you add the cookie information text should also offer the user the option to revoke permissions.
In the “Your Scripts” tab, you can find the code blocks that need to be added to your site. The top code block must be added to the top of your site’s head tag. The bottom code block should be added to the page where your KVKK Information Text and/or other cookie policy texts are located.

Before adding the code blocks to your site, you can check your information text and permission banner using the preview buttons on the left side of your Cookiebot panel.
We will proceed with the remaining Consent Mode setup on our Google Tag Manager panel. To make bulk edits on the permission settings of our tags, go to the “Admin” tab in the GTM panel and click on “Container Settings”. In the opened window, check the “Enable Consent Overview” option and save.

As the next step, we will add a new tag. After clicking the tag adding button, we go to the community gallery section at the top of the opened window and add the “Cookiebot CMP” template.

In the added tag, you need to enter your Domain Group ID. You can find this ID in the “Your Scripts” tab in the Cookiebot panel. The trigger for your tag should be set to the built-in trigger named “Consent Initialization – All Pages”.

The following setups aim to ensure that related tags are triggered according to the permission types given by users. There are 5 different permission types:
ad_storage Cookies collecting data for advertisements
analytics_storage Cookies for analysis purposes
functionality_storage Cookies for the functionality of the site/app, such as language settings
personalization_storage Cookies for personalizations
security_storage Cookies for security measures
Tags like Google Ads Conversions, Google Analytics, and Floodlight automatically determine which permissions they will be triggered in. For other providers like Facebook Pixel and Tiktok Pixel, you need to manually set the triggering permissions. To do this, go to the “Tags” tab and click the “Consent Overview” button in the upper right corner. Then, you can easily assign the relevant permission types in bulk by selecting the tags that will give the same permission types and using the “Edit Consent Settings” section, as seen in the image below.

Don’t forget to take a preview and verify your Consent Mode setup before going live. When you go live with the setup, you will be one step ahead in compliance with KVKK (the Law). Please note that you may experience a decrease in traffic due to users who refuse permissions after the setup. You can click here to reach our contact form to get a proposal for measures regarding KVKK’s (the Law) applications in the cookie field.
I would like to thank Arif Candemir from the Verini Koru team for his contribution to the preparation of this blog post.
See you in our future articles!
Hello, I am Mehmet Akif ÇANDIR, after working as an engineer in the sector, I started working in the Web/App Analytics sector with the contribution of my curiosity and engineering knowledge. I am improving myself and providing service as a Web/App Analyst. I have been working as a Web/App Analyst at Perfist since July 2022.
Perfist Blog
Similar Articles

Regularly monitoring the destination URLs of your Google Ads campaigns is one of the most effective ways to protect your ad budget. Broken or misdirected pages waste paid clicks, lower your Quality Score, and hurt your conversion rates. In this article we’ll walk you step-by-step through building an automation system that exports Google Ads destination […]
Read More
Senior Level Performance Marketing
In this guide, we will explain what a session is in Google Analytics 4 (GA4), why session duration matters, which session metrics are available, and how to configure these settings. What is a Session in GA4? A session represents the group of interactions a user has with your website or mobile app within a given […]
Read More
Beginner Level Web/App Analytics
What is GEO (Generative Engine Optimization)? GEO is a new generation optimization method that ensures content stands out in AI-supported search systems. It aims to produce content that can provide quick and clear answers to user questions. In addition to traditional SEO, a simple and understandable language that appeals to artificial intelligence is used. Why […]
Read More
Mid Level SEO
GEO is an optimization method developed to ensure that content is better understood and recommended by AI-powered search engines. Previously, when writing content, the goal was solely to rank high on Google. Now, however, AI systems read these contents and present summaries to users. This is exactly where GEO steps in. It ensures that content […]
Read More
Mid Level Content Marketing